Pages

Conditional and Data Driven Execution in SoapUI Sample Twitter Project

Test data can be prepared in external sources for data-driven testing. These data sources can be:
  • Excel Files
  • CSV Files
  • ODBC Sources
  • SQL / ADO Objects
I will share an example of reading data from excel file for Sample Twitter Project available in SoapUI-Tutorials. Data in the Excel file is formatted as below:

To read data in groovy script, you need to import POI or JXL libraries.Since JXL does not support .xlsx format I am using Apache POI to read data from the excel file. Latest POI JAR files can download from http://poi.apache.org/download.html. Make sure to copy all the JAR files in the lib folder of  SmartBear\SoapUI-5.3.0 before moving on!

The groovy script below can be added as first groovy script step in the test case of sample Twitter project. This script
  1. Reads data from excel file to determine if a test step should be executed or not.
  2. Determines and copies the test step name to be executed.
  3. Reads the data for property 'count' from excel file and uses it to set property value at test step level.
  4. Executes the test step with the modified count property value.
  5. Reads the test step property to verify that it was modified in step 3.
The output for above script should like below:


SoapUI Groovy Script for Sample Twitter Project


In the previous blog How to start testing SoapUI 5.3.0 Sample Twitter API Project  ,we successfully imported the Sample Twitter Project in SoapUI. Sample Twitter Project comes with one test case having four test steps.

Today we will add a simple groovy script step in the test case that will
  • Modify property value "count" for the first test step "Search Request"
  • Execute the first test step "Search Request" again from the script
  • Access the json response of test step "Search request" and write it to a file
  • Parse the json response to count number of tweets returned 
Right click on Test Steps and select Groovy Script to add a new step. Now copy paste the below code and click the play button.
All groovy scripts are invoked with following three objects. Click on the links to view a complete list of methods that you can use with these objects to modify your script.
You can check the methods for these objects and play around with the groovy script above. 

How to start testing SoapuI 5.3.0 Sample Twitter API Project


If you have selected tutorials under components while downloading SOAPUI 5.3.0, you can access SoapUI Tutorials from SoapUI-Tutorials directory directly. If you haven't you can follow the steps and download it from https://www.soapui.org/tutorials/twitter.html

Sample Twitter Project requires OAuth 1.0 for authentication for SoapUI events. To get OAuth you need to sign in and create an App at https://apps.twitter.com/. Click Create New App and specify application details. After you have created the App, you can click Keys and Access Tokens to get
  • Consumer Key (API Key)
  • Consumer Secret (API Secret)
  • Access Token
  • Access Token Secret
You can change permissions for your App depending on what you want to do with Sample Twitter  Project in SoapUI.
Next, you need to add all the required OAuth keys and tokens for your App at Project level Custom Properties as in screenshot below

Now to test if the REST request are calling the services,  Open the desired request and click on Auth (Profile) as below

Now select Add New Authorization in the Authorization drop down list as below
Select OAuth 1.0 in type and specify a unique profile name. Then click Add Token and specify keys and URLs in screen below

You can get URLs from Details tab of your App you created.

If your keys are authenticated, you will see them in green color with a green check mark as below. Now you are all set to play around with Sample Twitter API Requests in SoapUI 5.3.0.


SoapUI 5.3.0 scale up issue on Windows 10 Pro with default screen resolution of 3840 x 2160

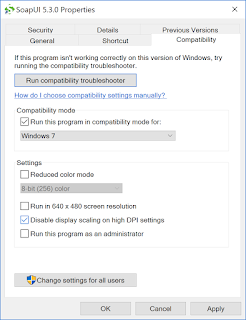
SoapUI (5.3.0) doesn't scale up itself on Windows 10 Pro (OS build 14393.1198, Version 1607), at default screen resolution of 3840 x 2160.  Fonts appear smaller than usual and are hard to work with even after modifying the "Disable display scaling on high DPI settings".
Right-Click on SoapUI icon->Properties->SoapUI Properties->Compatibility
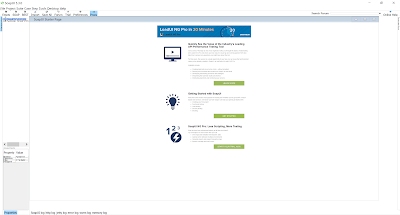
SoapUI navigator is still not displayed properly.
Notice the font in Project Navigator & Workspace properties is still disturbed.
This issue can be resolved in three steps below.
  1. Copy the contents of the file below and save them as SoapUI-5.3.0.exe.manifest in SoapUI.exe path such as C:\Program Files (x86)\SmartBear\SoapUI-5.3.0\bin. 
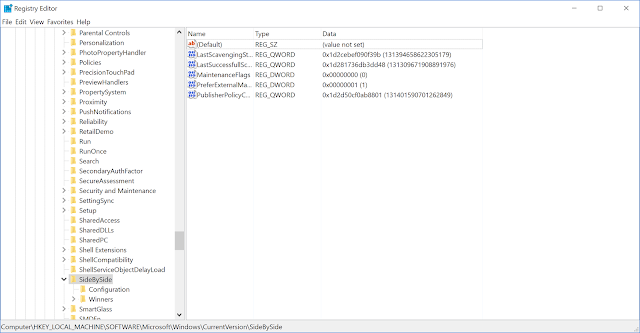
  2. Open Registry Editor by typing regedit in run. Select HKEY_LOCAL_MACHINE\SOFTWARE\Microsoft\Windows\CurrentVersion\SideBySide as in the screenshot below. Right click and select New -> DWORD(32-bit) value and create a new registry value by the name PreferExternalManifest and set the value to 1.
  3. HKEY_LOCAL_MACHINE\SOFTWARE\Microsoft\Windows\CurrentVersion\SideBySide in RegistryEditor

  4. Make sure "Diable display scaling on high DPI setting" is unchecked. Now restart SoapUI to use the properly scaled view.
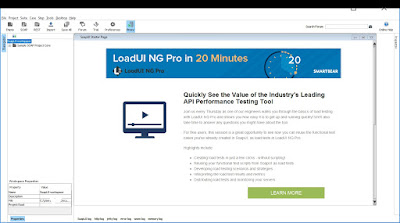
    SoapUI 5.3.0 fonts scaled properly in navigator and workspace panel on windows 10 pro

Microsoft Edge Webdriver Error: Element is Obscured

Microsoft Edge Webdriver sometimes gives the below error when you click on web element in your test code:


This is a known issue and can be traced at:
https://developer.microsoft.com/en-us/microsoft-edge/platform/issues/5238133/

There's a workaround available till Microsoft Edge team resolves this issue. You can click on the element using javascript in your test. It's an easy to understand three lines of code.
           
                WebElement e =  driver.findElement(By.linkText("Check Out"));
JavascriptExecutor executor = (JavascriptExecutor)driver;
executor.executeScript("arguments[0].click();", e);

  1. Start with finding the element and storing it in a WebElement object. 
  2. Create JavaScriptExecuter interface reference variable by typecasting the web driver object.
  3. Call the executeScript method and pass it the script to be executed and web element object from step 1.

Below is an example of a method that uses JavaScript to click on elements:
One important point to take into account is you will have to use explicit or fluent wait statements frequently to give JavaScriptExecuter the time to click on the web element.

Tips and Tryouts for TestNG Groups, Suites and Cross Browser Testing


TestNG framework annotations are very easy to understand and self-exploratory. You can find a lot of good tutorials to give you a good start! Below I am sharing some of the advanced things you can try for yourself while learning.
  1. TestNG groups can contain test methods in different classes. You will still be able to group them. Imagine you have a class A for test methods in one Page and class B for test methods in another page. You want methods in both pages to run in a batch. You can define the same group name for methods in both classes and test them together.  

  2. You can create multiple Suites.xml files to create suites of test cases and run them using testng.xml. Suite.xml file will include suite, test, classes, groups, parameter tag like it usual. However testng.xml will look now include suite-files and suite-file tag.

  3. Cross Browser testing was something I was excited from day one. It didn't turn out to be as complex as I had expected. You just need to pass the browser name in parameter tag of your XML file and your@Before annotation method. That's pretty much it. Seems quite simple! Wait until you try it with Selenium 3.4.0 on Firefox and Internet Explorer. The latest version of selenium gives you all kinds of issues with Firefox and Internet Explorer is notorious for messing with web elements and it's slower speed. I recommend developing your multi-browser tests to run on Chrome and Microsoft Edge instead. You won't be caught into googling known issues and be able to focus on the topic at hand.

Comparison of Implicit, Explicit and Fluent Wait in Selenium

Web sites frequently display widgets and ads on their pages or use AJAX calls to improve response time. Hence you don't have access to all web elements present in the page at once. Testers regularly use wait statements to wait for elements in DOM and test the behavior of the application. Below I compare the three types of waits. I'll try to make it as comprehensive as I can to give you guys a quick understanding at a glance.


Explicit Wait Fluent Wait Implicit Wait
Explicit wait only waits for the required element till the specified time runs out. Fluent wait will wait for the required element until it finds it or the time runs out. The implicit wait will wait for the specified amount of time for every element in the web page.
Explicit wait requires knowledge of prebuilt ExpectedConditions that must be met. All you need to know is the available ExpectedConditions options and you can master these three lines of code.
WebDriverWait wait = new WebDriverWait(driver,30);
WebElement e = driver.findElement(By.xpath(".//*[@id='mapDiv']/div/div/div[9]/div/div/div/a"));
WebElement e1= wait.until(ExpectedConditions.visibilityOf(e));
Fluent wait gives testers the option to define their own ExpectedConditions in form of a function. You can override the function in wait.until to check pretty much any condition you want to fulfill before accessing the web element.
FluentWait wait = new FluentWait(driver);wait.withTimeout(60, TimeUnit.SECONDS);wait.pollingEvery(5, TimeUnit.SECONDS);wait.ignoring(NoSuchElementException.class);
WebElement e = wait.until(new Function(){
@Override 
public WebElement apply(WebDriver w){
return driver.findElement(By.xpath(".//*[@id='mapDiv']/div/div/div[9]/div/div/div/a"));
}});
Implicit wait is easy to understand and consists of just one line of code. driver.manage().timeouts().implicitlyWait(20,TimeUnit.SECONDS);
Explicit wait makes debugging shorter as it only waits for the required element, not all of them at once. Take the above line of codes as an example, web driver will wait for full 30 seconds no matter it finds the element or not. Fluent wait makes debugging as short as it can by returning the control as soon as it finds the element. Consider the lines of code in above example, web driver will look for the web element every 5 seconds and will return the control immediately after it finds the element. In case it doesn't find the element, the control will be returned after the timeout limit expires. The implicit wait can make debugging issues tiresome since it has to wait for the specified time for every element. Imagine the amount of time it will take your test case to run and conclude if it's unable to find more than one web elements.
Explicit wait is efficient way to wait for web element and can be used when you can utilize one of the prebuilt ExpectedConditions. Fluent wait is the most efficient of all. You don't always have to wait for the TimeOut attribute to expire and continue with the execution of test case. It is also the Hobson's choice when you want to implement your own version of ExpectedConditions. The implicit wait can be very handy when you want to view the execution of every step in your test case while you are learning to code.

Five mistakes beginners make accessing web elements using xpath in Selenium


When I started learning selenium I wanted to work with absolute xpaths and focus on more complex stuff. As I moved on testing web pages I realized creating relative xpath to access web elements is unavoidable and can take a lot of time when you are a beginner. Below I summarize five common mistakes we all make accessing web elements through relative xpaths.
  1. Identifying an element when it contains a special character can throw unwanted errors and take a lot of time if you surround it with a single quote ('). Consider finding the element with text "Let's Talk Tea" with single quotes in example below:  System.out.println(driver.findElement(By.xpath("//*[contains(text(),'Let's Talk Tea\")]')).getTagName());
    Always surround your text with special characters \" and you are good to go!
     System.out.println(driver.findElement(By.xpath("//*[contains(text(),\"Let's Talk Tea\")]")).getTagName());

  2. Making xpath expressions with multiple conditions can simply be done with AND and OR keywords. This simple task can turn complex if you don't know these are case sensitive. Following xpath expressions are not same.
    driver.findElement(By.xpath(".//*[@type ='text' AND @id='email']")).sendKeys("test");
    driver.findElement(By.xpath(".//*[@type ='text' and  @id='email']")).sendKeys("test");

  3.  @type = 'text' and text() are not the same. @type = 'text'  selects web elements that have attribute type set as text in the DOM while text() is method used to find elements with exact text match.
  4. driver.findElement(By.xpath("//td[text()='UserID']"));// selects the WebElements displayed with text 'UserID' on the web page.
    driver.findElement(By.xpath("//input[@type()='text']"));// selects the web elements with input type text.


  5. 'following' and 'following-sibling' keywords can not be interchanged. 'following' selects the web elements in the current node while 'following-sibling'  selects nodes that are sibling to current node or in other words are on the same level as the current node.
  6. driver.findElements(By.xpath(".//*[@class='active']/following-sibling::li"));// returns all the elements in sibling nodes after the closing tag of the current node.
    driver.findElements(By.xpath("//*[@type='text']//following::input")); // returns all elements after the closing tag of the current node.


  7. 'child' and 'descendant' keywords can not be interchanged. 'child' selects the child web elements in the current node while 'descendant'  selects all child, grandchild elements in the nodes following current node.

  8.  driver.findElements(By.xpath(".//*[@class='wsb-navigation-rendered-top-level-menu ']/child::li");//returns all the child element of the current node.
    driver.findElements(By.xpath(".//*[@class='form-body']/descendant::div");// returns all child and grandchilds of the current node.